The project was actually born when we had to go to a masquerade themed 30th birthday party. Rules were, you don't get to come in unless you're dressed up! My creative juices got flowing and I decided I could make a mask (in addition it was short notice, so... it was my only option?)
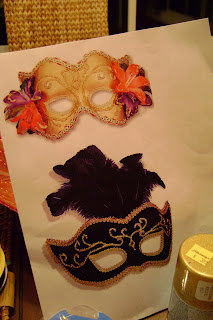
I found these two inspiration photos, and printed them out...
I ran to Beverley's on my lunch break, and found the essentials: fabric covered masks, gold rick rack, glitter glue, rhinestones, ribbon, feathers, dowels... and this is when I purchased my little hot glue gun. :)
Have you heard of the millions of projects you can use hot glue guns for?! I used it here & here and am looking for more uses... I digress.
Ok, so back to the masks.
I laid newspaper down, and got to work. I had to try out with the black one first, since that was for Z. :) Luckily it worked out well.
I trimmed out the edge, and the eye holes with the gold rick rack on both masks. Because they were covered in a fabric texture, the glue held really well.
I then followed my inspiration photos, and started in with the gold glitter glue.
While this was drying, I wrapped my dowels in ribbon (gold for mine, and black for Z's) and added streamer strips to mine.
Mine got feathers, in the classic mardi gras colors: purple, green, and yellow- they were sold together in a pack, so I lucked out :)


