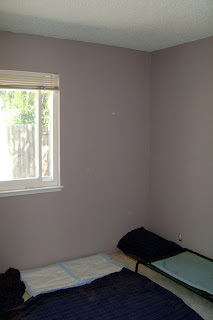
Here are the before Photos:
(notice that *awesome* outdoor light fixture on the wall. eegads. It has yet to be replaced. sigh.)
So, in order to make these horizontal stripes on my focal wall, along with the faux crown molding, I did the following back in May.
First, I removed everything from the room, and went to the store. I had taken a day off work to have a three day weekend, and trust me, painting hadn't been on the agenda. In fact, when Z got home from work that day to find me painting, he started laughing, but didn't think anything unusual of it. Love him!
I used my Pittsburgh Paints fan deck, and chose the base color to be Navajo White (which I later found out to be a popular choice?) I had picked a darker tan for the contrast stripe, but when I got to the paint store, there was an oops paint of a nice soft grey that I picked up for $5, and worked so much better!
I painted two coats of the Navajo White paint right over the purple after taping the window sill up. I didn't worry about going all the way to the top of the ceiling since I knew I was going to paint a white border along the top.
After that dried a bit, I taped up the 4" crown border for the focal wall. At the top of the ceiling, I measured down 4" because I knew I wanted a thick looking molding (all as a test!). Because I was using 1" painters tape, I placed the bottom edge of the tape at the 4" line I had drawn using my laser level and a few pencil lines. Then, I started calculating for my large 12" stripes. I measured them out and taped them. In order to paint as little as possible, the stripes looked off when taped up. In reality, they were all the same size, but because the Navajo White was already on the walls, I only needed to do the 12" grey stripes. I put small bits of painters tape in the stripes that I wasn't supposed to paint with the grey.
I think that's about it! Take the tape off, and enjoy the look of your hard work, and maybe wipe the sweat off your brow.
This of course was all before I removed the popcorn ceilings in this room, so the ceiling looks dingy. I couldn't recommend the removal enough for those of you that have it still. It looks completely different the MINUTE it's removed. I love it (even though it's not done just quite yet)
*Note: my room was NOT square. I had to eyeball the levelness (is that a word?) of the line, even though the paint line was straight. Does that make sense? I had to do that for the crown stripes, as well as the focal wall stripes.
I still haven't addressed the old style gold sliding closet door mirrors in this room, but the dogs don't mind, and I think they like living in style. :)
Total Cost:
$15 Gallon of Navajo White (didn't use the whole thing, about 25% left
$5 Gallon of Grey
$8 Quart of flat white
4 framed New York black & white photos $0 (we've had those for 3 years, and hadn't hung them before!
TOTAL: $28
Anyone done any awesome paint treatments? What about stripes of various colors, sizes, or orientations? Do tell!


