Pages

WELCOME!

Happy 2012!

Welcome, won't you stay a while? There's so much to do, and we hope to share it all with you this year. Design, crafts, frugal living... You'll find this and more at Design-Aholic!

Showing posts with label fabric. Show all posts

Saturday, March 19, 2011

Update to the no cost makeover

Wow, nearly 2.5 months since my last post.  That's a record.  I miss you all!

I did end up doing my little "no cost" make-over, but it was slightly modified in terms of the "no cost" part.


In order to get the blue, tan, white & black color scheme I talked about in my post, I ended up buying some fabrics to make the toss pillows that pulled the design together.  So, I'll count that cost.  The rest, I just moved the furniture around like I figured I would, but still haven't bitten the bullet and painted that ladder shelf. (Going from white to black, to really pull the theme together.)


So, the fabrics I purchased were super inexpensive- one was $5.99/yd, the other two were 2.99/yd.  I purchased 1.5 yards of the black and white damask, and 1 yard each of the trellis and circle damask.  Also, I had found a white fabric shower curtain on clearance for $2.50 at Target, so I used that also to make two solid white pillows.  I still have enough of the trellis fabric to make another pillow, so even though the fabric total was around $16, I didn't use it all!


Also, the mirror above the fireplace was purchased in 2010 (Just before Christmas) so it doesn't count in my 2011 project cost tally (but for score keeping purposes, it's a huge round, chunky mirror, exactly like I wanted, and it was $45.)


So, I moved the couches, moved the ladder shelf, put in another table and my Louis XVI chair, moved the sofa table, and added in a small cabinet (yet to be painted) with a lamp.  We got a new TV stand (also in 2010), and have the glider from 2010.  (Love the glider, but it's hard to decorate around!)


Stay Tuned!  I've got a lot of posts coming up soon- even though I haven't been posting much, I've been taking photos of everything I'm doing.  It's been a busy place around here, and is just about to get busier!


PS: Baby C is growing like a weed!  Here's a sneak peak at his weekly pictures.  YES!  I'm still taking a new photo EACH week!

Week 1:

Week 10:


Week 20:

Friday, October 8, 2010

Two-Toned & Lined Curtains

I made curtains again!  Gosh, our baby is lucky I've taken to sewing lately...


These were imagined back in June, when I stopped off at Home Fabrics, and picked up the three main fabrics for baby boy's room.  Remember when I showed you this fabric set (polka dots used to cover the glider cushions, that I showed you HERE):


To go with our bedding set my awesome cousins purchased for us:


I wanted a pulled together room (designed from scratch) but not something totally matchy-matchy which a lot of nursery stores provide.  So, I imagined these curtains while walking through the store.  The top fabric is green and white houndstooth, and the bottom is a blue and lighter blue stripe.


The curtains, for now, are hung on the closet as doors since the doors that were installed were not going to cut it (bi-fold doors, braced together so they opened like regular doors, plus they didn't shut tight and seemed cheap).  They're fully lined, in case they become window treatments later (in order to black out the sun while baby sleeps

Since these were all straight stitches again, I didn't really make a tutorial.  But, essentially, I measured the full length I needed which was 84" (luckily the closet and the window are the same length, if I want to swap the curtains later), measured the width of the blue stripe fabric I wanted to use, and subtracted that from the full length needed.  I cut down the houndstooth and blue stripe fabric (with seam allowance) to the proper size.  I sewed the blue and green together first, and then the white liner onto the back.  The top seam is rough, but since I knew we were just going to use clips to hang them, it wasn't a huge deal.


With a typical spring loaded shower curtain rod, I hung the curtains as "doors" for the closet.  They are a nice touch, and hide the closet that's still a work in progress of organization (even though I've been given orders to kick my feet up and not do much... which bums me out, but it awefully nice!)


Oh, and Shhh, they hide this:


Yep, I forgot I still have to paint these small portions of the closet sides.  We were going to cover them in the beadboard, but time got away from us.  The paint will be fine for now.  :)  When I get around to it.

Here are a few shots of the curtains from different angles:


(those small frames resting on the crib will be hung on the wall soon...)

(Do you see that laundry basket at the bottom of the closet?  Check that revamp out HERE!)

So, what do you think?  I can't wait to show the whole room put together- there are just a few finishing touches that hopefully we'll have time to get to this weekend. 

Thursday, October 7, 2010

Boat Applique Pillow

Wow, I AM getting good with the sewing machine!  Or, at least I hide the imperfections well.  :)


Remember when I made the polka dot slipcovers for the glider?  It's super cute by itself, but I thought the small little 12x16" I had bought would be so cute as an accent (Plus, potential actual lower back support on the glider, if needed!)


I've had a few pillow cover creation mishaps, so I thought since I've taken to sewing lately, that I might be able to do this one quicker and easier, and I did... but I cheated.  How, you ask?

This small pillow was encased in a plastic bag when I bought it, that I realized fit PERFECTLY around the pillow, and allowed it to be nice and plump.  So, I cheated by using the bag as fabric cut guide.  You know what?  It worked!  It even had an envelope closure, instead of being seamed all the way around. 


So, with the extra drapery lining fabric I had (solid white) leftover from the nursery curtains, I made the 3 fabric cuts: 1 for the front, and 2 for the back to make the envelope closure.  Again, straight seams made this easy to put together.  I did turn it right side out, and fit the pillow in, and needed to bring the side seam in a bit, so I just turned it out, and made a new seam.  Fit better the second time.


I pulled the quilt out, and picked the boat I wanted to duplicate, and drew it out on a paper so I could cut the fabric to the right size (after all, the rest of the nursery is starting to look polished and pulled together, and the last thing I wanted was the accessories to look sloppy)


I had planned to sew the appliques on, but since I did kind of mess up by sewing the whole case together first, that didn't quite work...  But, fabric glue worked just fine.  I could hand stitch them later, if I feel so inclined.  (yea right, after the baby is born?!)


But anyway, as it's all coming together, I love it!  Here are some photos of the little pillow on the glider, and how it all fits together in the room.  Oh, and did you recognize the sail fabric?  It matches the "C" artwork frame I did a few weeks back.  Check that project out HERE.  :)


And, if you're interested in the painted barn stars on the wall, I love them!  I posted about them just the other day... check that post out here.

So as it all comes together, I can thank this little puppy:


Who knew I'd become a sewing fanatic!  I always felt more crafty than being a seamstress, but perhaps it's just another tool to be crafty.  Who'da thunk?!

Sunday, September 12, 2010

Polka Dot Play: Slipcovering Glider Cushions

As you know, if you've checked in at all here at Design-Aholic recently, we've been working on finalizing our baby boy's nursery.  Last weekend, I took an extra day off to make the labor day holiday a 4 day weekend.  I mentioned last week I got a lot done, but unfortunately, lost all my energy during the week and didn't show you anything!  At least now, I can finally unveil the recovered/slip-covered (depending on how you want to view it) glider cushions!

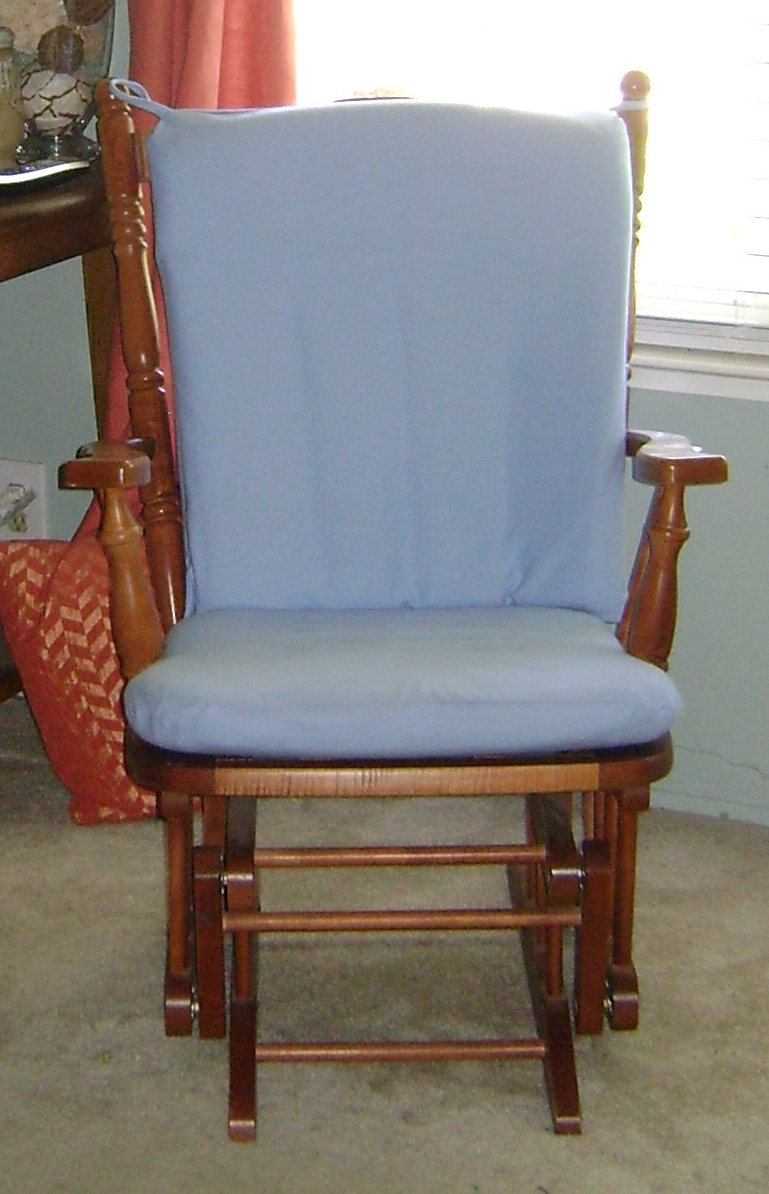
First, since I'm proud of myself, here's the "after":


Do you recall the "before"?  Dirty, plain light blue fabric.  While the slipcovers were constructed well (maybe even better than mine) the ottoman was a joke.  Some things you improve, some things stay status quo.  At least the overall looks MUCH better than it did when I bought it with my friend Annie (check out her blog here, at Confessions of a Navy Wife.)


So, to get started, I cut two squares of fabric from my humongous piece of polka dot fabric that would work for the size I needed.  (seriously, what was I thinking?  I could cover two more full ottoman sets at LEAST with the amount I have left!!! I think I got something like 4 yards of 54" fabric?  Good thing it was a STEAL...)


Then, I removed the blue covers from the cushions (which just sit in the chair form, aren't snapped, banded, or otherwise actually attached to the frame) and laid them out on my wrong side up polka dot fabric.


I laughed a little when I saw the backs and bottoms of the cushions were just hand sewn together...


There were two cushions to slipcover- the back, and the seat cushion.  The back was more or less a square, but had the trickiness of needing the loops to hold the cushion to the frame sewn in.


Let me just pause here a minute.  Did I even mention to you that I haven't pulled my sewing machine out in months, and now I was planning to tackle making my first slipcovers?  No?  Well, yes, I was petrified.  The last thing I made were these straight seam orange curtains, and these envelope fold chevron fabric pillows... For some reason, winding the bobbin, sewing rounded seams instead of straight... all these things gave me the heebie jeebies.  I don't know why I was so scared.  Really.  I think I was most concerned about getting the tread all tangled up in the insides of the machine because I did something small and stupid.  But, alas, reading directions helps!  Even though the poor translation of these Janome instructions made us laugh the first time I used the machine, months back, this time was serious and I had to pay attention to what they said... Outcome?  It worked.  Just fine.  Now I'm not scared.  End the pause.

I attempted the back cushion first, and it went relatively well.  I left the bottom seam open until I tried it on the cushion, and fit it to the chair.  When I realized it worked, and was finished with my happy dance, I sewed the bottom cushion closed.


The rounded edges of the lower cushion posed a slight problem for me, but going slow with the foot pedal, (no, I guess this was not the autobahn) it worked out.  For this cushion, I had actually traced the pattern with a pen as well as pinning it, so that I had a guide to work by.  Since the fabric is so heavy duty, it doesn't show through at all, and me being scrappy, I had just used a ball point pen anyway to do the tracing.  :)


Is it just me, or does this look like a piece of toast?  No?  I'm just pregnant and hungry you say?  ok, fine...

Sewing this cushion together at the back (the last seam) was trickier than the first because I hadn't left much excess fabric to work with.  After some help holding it properly from Z, a broken nail, and some severely sore and tired hands, the cushion was closed (but looked like crap on that back seam) and fitted to the chair.  Shhh, don't tell anyone how bad the back seam was.  :)

Anyway, even though the nursery isn't being re-assembled yet, we're already enjoying the glider.  It's still in the family room, and I just love the polka dot fabric.


And, as a nursery checklist reminder, the following projects still need to be completed:

- Chair rail added above the beadboard (in progress today, weeeeeee!)
- Baseboards added to the floor (in progress today, weeeeeee!)
- Furniture (well, the crib at least!) to be built
- Furniture placed (dresser is in the garage still, and yes I "won" the one I saw on craigslist!)
- Artwork Hung

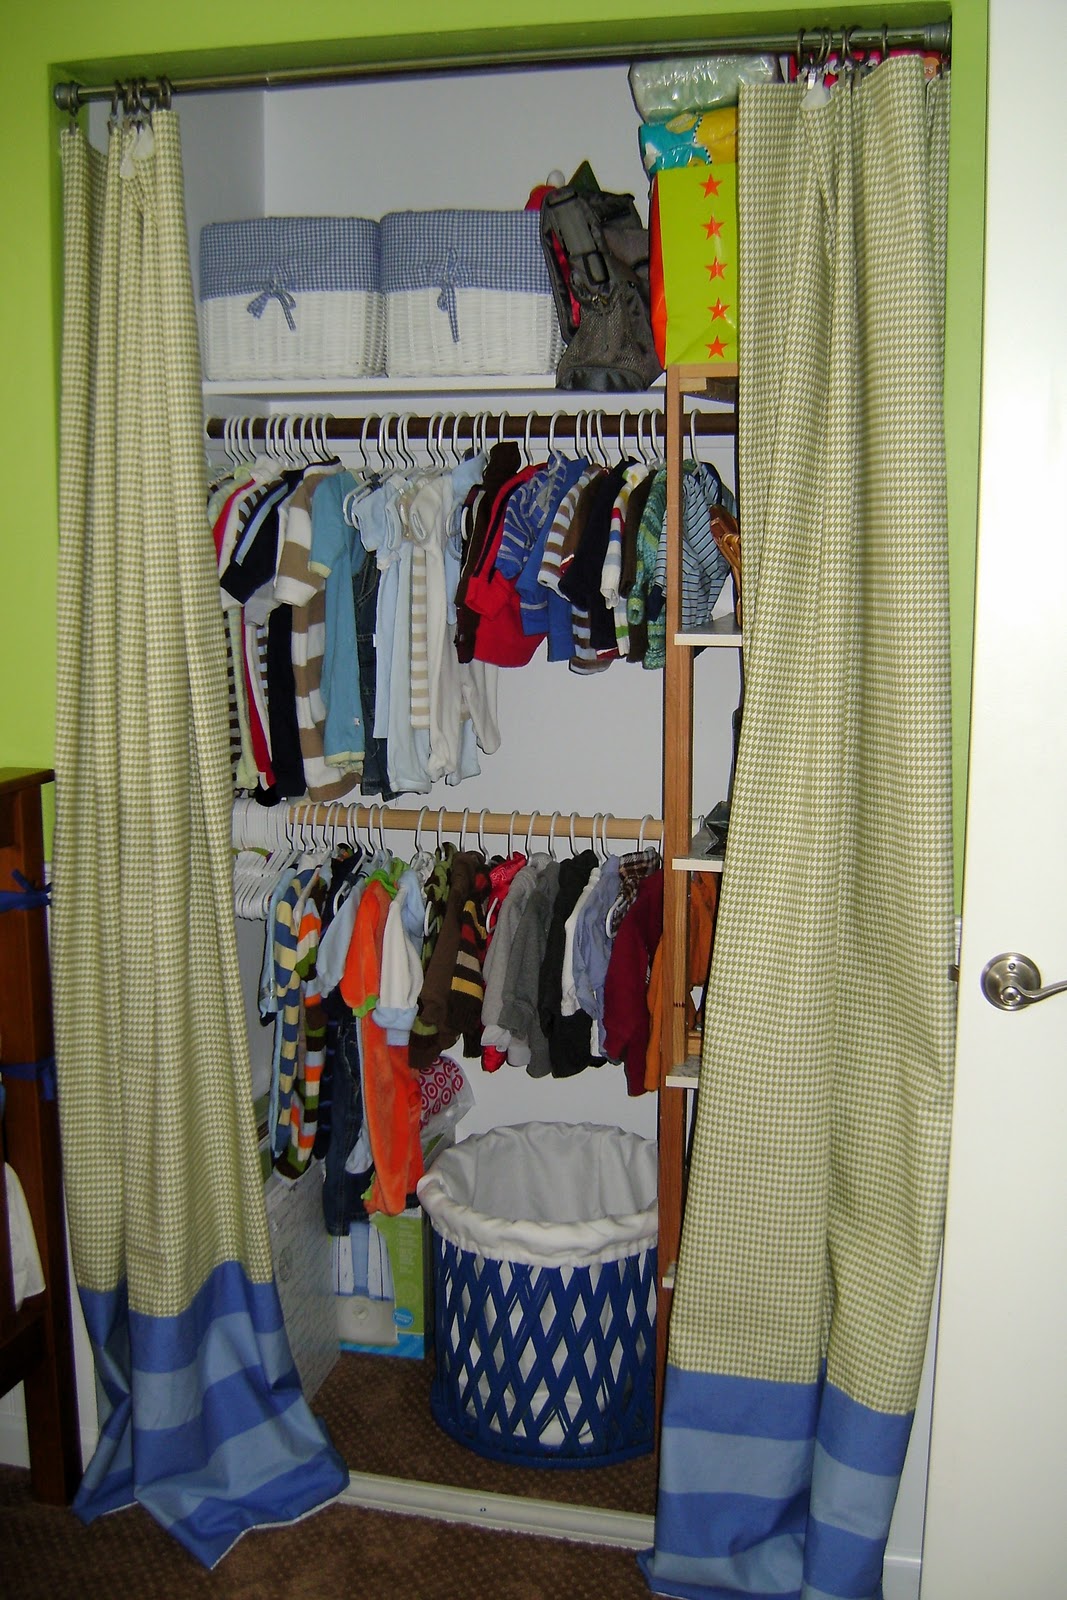
... The curtains are finished, I'll share those with you soon too... Here's a sneak peak:


Here's the mood board, again, for the eleventy-billionth time:


And, to my (really, my sister's) sewing machine, I'm sorry to have doubted you.

So there's the recent progress... We're getting there, and so is the final baby countdown.  As of today, I'm now 35w1d... time is closing in on us :)
Related Posts with Thumbnails