Pages

WELCOME!

Happy 2012!

Welcome, won't you stay a while? There's so much to do, and we hope to share it all with you this year. Design, crafts, frugal living... You'll find this and more at Design-Aholic!

Showing posts with label green. Show all posts

Friday, October 8, 2010

Two-Toned & Lined Curtains

I made curtains again!  Gosh, our baby is lucky I've taken to sewing lately...


These were imagined back in June, when I stopped off at Home Fabrics, and picked up the three main fabrics for baby boy's room.  Remember when I showed you this fabric set (polka dots used to cover the glider cushions, that I showed you HERE):


To go with our bedding set my awesome cousins purchased for us:


I wanted a pulled together room (designed from scratch) but not something totally matchy-matchy which a lot of nursery stores provide.  So, I imagined these curtains while walking through the store.  The top fabric is green and white houndstooth, and the bottom is a blue and lighter blue stripe.


The curtains, for now, are hung on the closet as doors since the doors that were installed were not going to cut it (bi-fold doors, braced together so they opened like regular doors, plus they didn't shut tight and seemed cheap).  They're fully lined, in case they become window treatments later (in order to black out the sun while baby sleeps

Since these were all straight stitches again, I didn't really make a tutorial.  But, essentially, I measured the full length I needed which was 84" (luckily the closet and the window are the same length, if I want to swap the curtains later), measured the width of the blue stripe fabric I wanted to use, and subtracted that from the full length needed.  I cut down the houndstooth and blue stripe fabric (with seam allowance) to the proper size.  I sewed the blue and green together first, and then the white liner onto the back.  The top seam is rough, but since I knew we were just going to use clips to hang them, it wasn't a huge deal.


With a typical spring loaded shower curtain rod, I hung the curtains as "doors" for the closet.  They are a nice touch, and hide the closet that's still a work in progress of organization (even though I've been given orders to kick my feet up and not do much... which bums me out, but it awefully nice!)


Oh, and Shhh, they hide this:


Yep, I forgot I still have to paint these small portions of the closet sides.  We were going to cover them in the beadboard, but time got away from us.  The paint will be fine for now.  :)  When I get around to it.

Here are a few shots of the curtains from different angles:


(those small frames resting on the crib will be hung on the wall soon...)

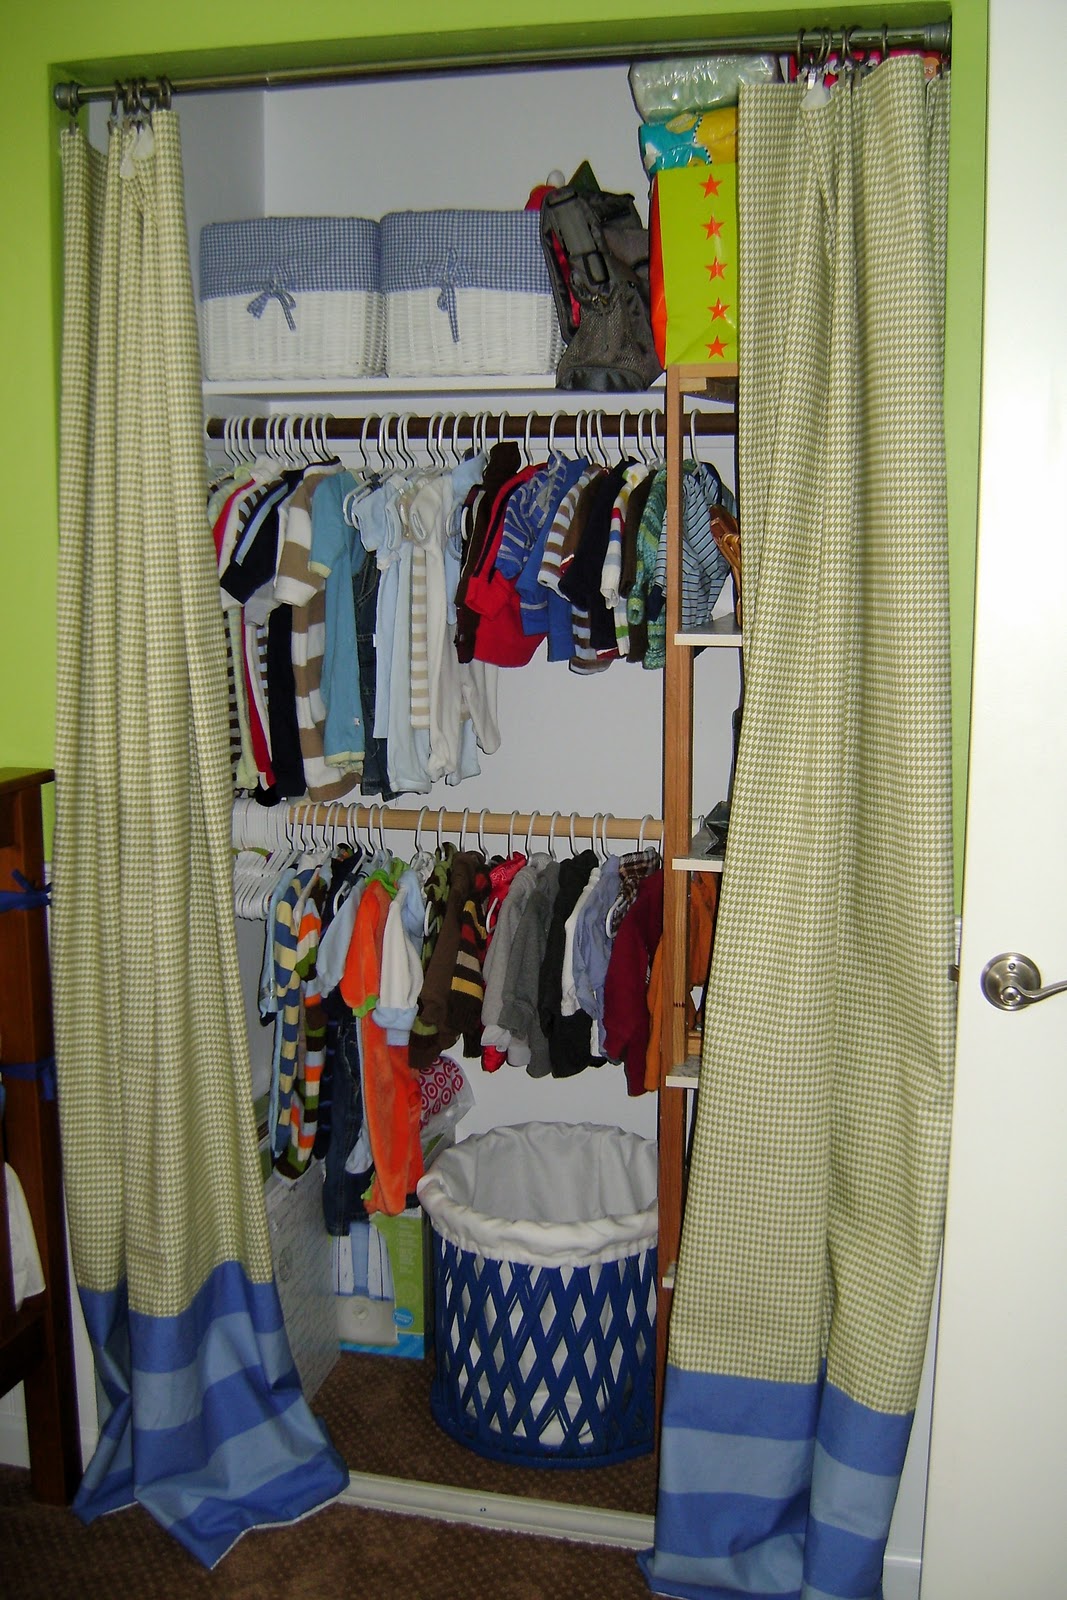
(Do you see that laundry basket at the bottom of the closet?  Check that revamp out HERE!)

So, what do you think?  I can't wait to show the whole room put together- there are just a few finishing touches that hopefully we'll have time to get to this weekend. 

Monday, September 6, 2010

Initial Artwork: Letter C

I suppose initial artwork, or lettering in the nursery is nothing new.  It's nice to stamp a nursery, or a kids room with their name to make it more personal.  (Heck, I've even talked about my love of monograms before too!)  When we settled on a name for our baby boy, I was able to purchase a white letter "C" to try to attempt a project along these lines.

So, here's what I did.


First I took an $8 clearance frame from Home Goods (regularly $25!).  Of course, the butterfly motif wasn't going to quite cut it with the baby boats bedding.  :)  It was all wrong!


The white frame stayed, but the green mat was painted blue.  I painted this with acrylics, and I think it looked like wood when I was done.  I just loved that the mat was cut to fit the square frame already, plus the cut out/lined details were great.


Because of the depth of the frame, I was able to adhere the C to the board, and still have room to close the frame down.  First though, I needed to cover the cardboard backing with green houndstooth fabric, that matches the curtains.  I used spray adhesive and adhered a piece of fabric to the top of the cardboard.  Since the mat was going to cover the edges of the cardboard backing, I didn't fold it around the back edges... just simply adhered to the top.


Then, after a failed hot glue gun attempt at putting the C on the fabric, I checked out my E6000 glue for it's specs... turns out it adheres fabric to wood with a 3 smiley face rating (I guess that's good?!)  So I dabbed it on the backing of my MDF "C" and placed it in the middle of the fabric (I had lined up the mat as a guide.)


Then, just cleaned and reassembled!  Oh, I just L-O-V-E it, but am even more excited to see it on the wall in baby boy's room!


It's amazing what a little vision and paint will do!

What do you think about the transformation, and colors?

More to come on the nursery progress.  Labor Day Weekend brought a lot of progress that I can't wait to share!

Friday, August 20, 2010

Nursery Progress Report

I felt it was time to show off some of the in-progress projects that are going on nursery-wise around here.  We had a big weekend planned, but that was derailed realizing I'm sick, yet again (seriously?  SERIOUSLY???)

Either way, some really great progress has taken shape, and I'm feeling less stressed than before (read: still slightly stressed, but just a little less...  :)  )

First, I'm happy to report that the painting of the walls in the nursery is 100% done!  If you recall, I used Olympic Premium No-VOC paint, mixed to PPG's Lime Green 209-5 for the walls.  I did the dirty work first, one night, of cutting in, and the edging.  This way the rolling of the paint took no time.  This paint is awesome!  It went on really well, and though I did two coats, I could have gotten away with one had I put it on a tad thicker the first coat.


Next, we have purchased the beadboard, chair rail, and baseboards- all 40 linear feet!  The beadboard is cut (the sheets start out 8x4') in half, so I have 10 sheets that are 4'x4'.  I think we'll go with 38" high beadboard, so we'll need to make some cuts for that to happen.  The garage will be set up like a workshop this weekend, so that hopefully next week some of the hard labor of wood installation can actually start.

Then, the remaining painting (chair rail, beadboard, and baseboards) can occur!  This part of the project I can't help much on... it kills me!

As for some of the other touches, those are definitely on their way.  If I can get some sleep today, and feel ok tomorrow, I should be able to knock those projects off the list!  Remember my design board?  Well, I'm talking about the star artwork, the mobile, and the alphabet art. 


I'm still a little frightful of sewing the replacement covers for the glider and making the curtains, since I've only used my sewing machine a few times!  (Remember these curtains, and these pillows from earlier this year?)  I think the curtains for the window are slowly turning into curtains for the closet instead, and the intention of purchasing blinds for the window is becoming a reality.  Either way, the fabric will be a nice touch- just depends where it ends up!  (Closet doors were removed, and I really want to be able to hide that mess!)


We still don't have a dresser, even though I know the one I want.  I've been striking out lately, even though I did get excited when Kate @ Centsational Girl found the same one I was looking for, and painted it white...  We're in the same area, and it seems that folks just love those dressers, and they either aren't selling them, or they're snatched up quick! But, I'm keeping my fingers crossed for one that was just posted about 30 min ago, and it's already white!  :)


I'm really having fun watching it all come together, and planning for what happens next, I'm just a bit anxious about it all getting done.  Looking at the calendar, there really are limited weekends left to work with.

How long did it take you to pull a room together?  Did you ever have a room that felt like it just wasn't going to EVER be done?  Do you work well under pressure, and deadlines?!  Do tell!

Saturday, July 31, 2010

Manzanita Branch Centerpiece Decor

To continue tutorial time, (I recently posted about the pearl bridesmaids bracelets as well!) today I wanted to share with you the process for completing the manzanita branch centerpieces we used for our wedding reception.  :)


I had the idea for the branches long ago, but exactly how to construct and complete them didn't really hit until about a month ago.  A few friends went to a wedding and posted pictures of what would be the final inspiration for our centerpieces:


As you may (or may not?) recall, I purchased 12 branches inexpensively from a Californian seller on eBay.  All 12 branches shipped were like $75 or something silly.

The rest was really easy-

We used 5" cedar fence boards cut to size for the bases- these we hand picked for straightness (7 of them) at Lowes, which is also where we picked up the paint too.  Originally we were going to glue them together, but ended up using a nail gun and finish nails and they were done in a snap (Z did the leg work on these, Love you!)

Yep, check out that price: $1.89/ea.  Love it!


After the boxes were built (we ended up with 14, and wood left over) they were coated twice with black semi gloss paint... another great find!  I was about to have the paint counter mix up black for me, when they took too long and I started poking around the paint section... Low and behold, there was a quart of BLACK Valspar semi gloss for $2.50 on the "oops" paint rack.  SCORE!  My friend Gina painted one coat, then later that day, Z painted another coat on the boxes, giving them a nice sheen.


I purchased 12 packs of floral foam at the dollar store, and spanish moss at Joann's (I used way less than I thought I would- I purchased 4 bags, and have 2 whole bags left- could have just purchased the same stuff at the dollar store!)


The branches were secured in the boxes with the floral foam- each one took about a whole package of the foam, and luckily it was already cut into 4 blocks (each "pack" was $1 and had 4 small bricks in it).  Some of the branches required a bit more support, and a stuck a river rock or two in with the floral foam.  Those also came from the dollar store, and I have extras!


After the branches were secured, the next day we added the spanish moss around the top of the boxes to cover the base of the branch and the foam.  Then, we used the pom poms and simply hot glued 1 at the base of every centerpiece, and a few throughout the "branches".

 There's my sister contemplating the next pom pom location.  Please excuse the messy garage background.  :)

The colors turned out perfect- and they looked exactly how I had hoped.  :)


All in, these 12 centerpieces, which we gave away to guests cost just about $110, or $9.50/ea.

Here's the breakdown:
12 manzanita branches: $75 shipped from eBay listing
7 cedar fence boards: $14
1 quart black semi gloss paint: $2.50
2 packs of tissue paper (for pom poms): $3
2 bags of spanish moss: $3
12 packs of floral foam bricks: $12
TOTAL: ~$110 (or about $9.50/ea)

When I have some good photos from the photographers, I'll post those, but for now, heres an action shots from the reception where you can see them on the tables (sort of):


Oh, and I found out that people loved "winning" the centerpieces!  One of my family friends getting married in January is even going to make them for her wedding!  I hope we get to go and see them :)

So, what do you think?  Pretty thrifty, eh?  It's the name of the game I tell ya- champagne taste on a beer budget.
Related Posts with Thumbnails