Pages

WELCOME!

Happy 2012!

Welcome, won't you stay a while? There's so much to do, and we hope to share it all with you this year. Design, crafts, frugal living... You'll find this and more at Design-Aholic!

Monday, November 30, 2009

Nana's Nick-Nacks

Over the years, there have been things that I've seen while visiting my grandma, that I felt just belonged there.  They were her nick-nacks that she'd gathered over her life, and through her travels.

When I was much younger, under 12 at least, I remembered this small, 1" cut crystal faceted globe type piece that sat on my Nana's reading table, right next to her chair, and a stack of books.  I probably appeared mesmerized when I looked at it, because of the colors it reflected, and rainbows it created.  I  mentioned one time that I would love to have something as sparkly as that one day.  To my amazement, the next time I saw her, she brought me the globe, and told me it was mine.  To this day, it's always held a place of distinction wherever I've lived.  For now, it's in my Kitchen Window display.

While it was slightly morbid, my Nana had said that she wanted to make sure that I got it before she died.  We're all lucky, because well, she's still here, and finally has chosen, to the excitement of our family, to move out of the mountains and much closer to us. We're talking a quick hop on the freeway, and 20 min later (rather than over 2 hours, and some car sickness) we're there.  She had to downsize when she moved, and through that process, some of the other nick-nacks I had told her I really liked, got transferred my way.

Here they are, and the stories behind them.


Cut Crystal Globe
(story mentioned above, from my point of view.  I'm actually not sure where this one came from.  I'll have to ask)


(my sister gave me that gold yoga frog, and I made him festive with a red bow this past weekend :)  and you can see my favorite photo of the puppy's noses in the frame behind... )

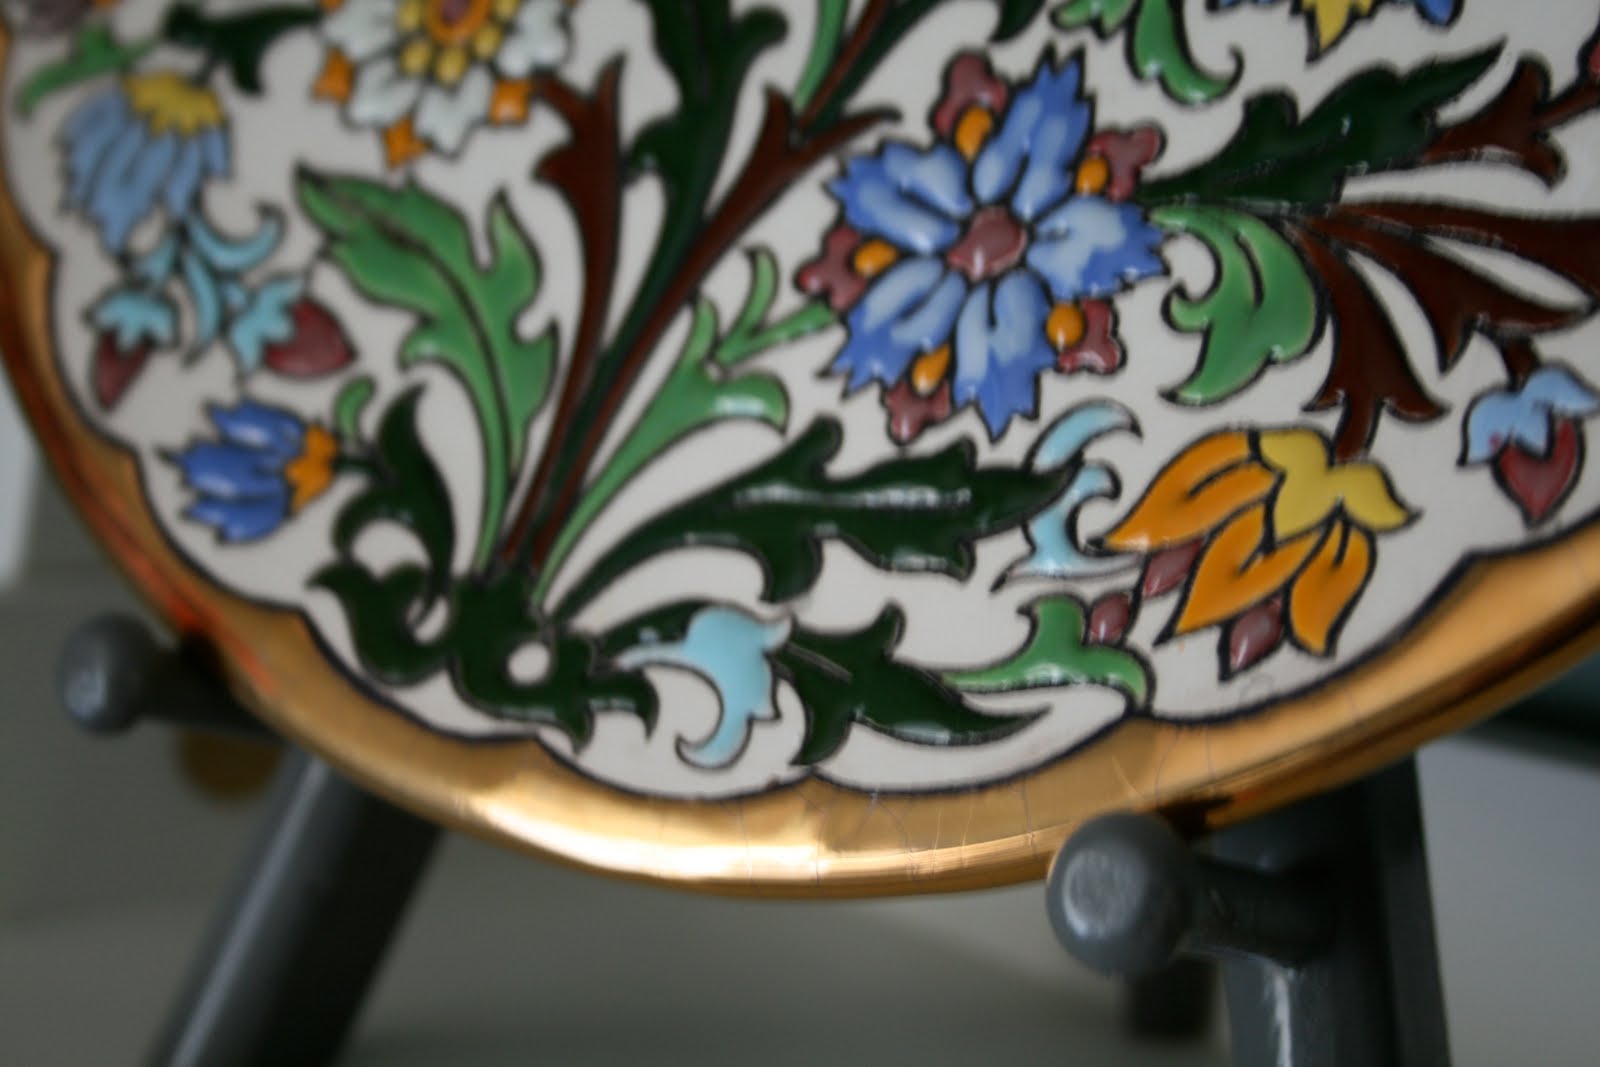
Spanish enamel, 24k plate
(I was supposed to be my Nana's travel buddy.  She got re-married when I was just over a year old.  I was at that time the youngest grand child, and was crawling all around their wedding photos.  I didn't get to be her travel buddy, but her and her husband certainly did a good amount of traveling.  This plate came from Spain, and is made with "secret enamels, and a 24k gold rim".)


Pink Salad Dish + side bowls
(My mom's Uncle, my Nana's Brother, picked this bowl set out from a fancy store, and was apparently very proud of himself.  It was a set my Nana liked so much it was labeled with her name on the bottom, just in case someone thought it was theirs... :)  This is a heavy piece, and I can't wait to decorate the table with these bowls at Easter time.)


Clear Glass Salad Dishes
(These two Dishes were an anniversary present for my Nana and grandfather, before he passed away when my mom was only 10 years old.  That makes them over 45 years old.  I love that these were something that my grandfather that I never met had.  How special.)


Pewter Potpourri Dish
(This dish was one of those things that, while not my style, I felt I should certainly say "yes" to accepting.  It was the first piece she offered me when I saw her new place here a few weeks ago.  I planned to use the glass bowl to catch coins at the front door, but I toyed around with the idea of painting the lid a totally modern color (bright green?  bright pink?) and maybe using it in a baby's room one day.)


Etched Juice Glasses
(These are amazing.  Much better than even the pictures show.  There are 8 of them.  And they're heavy.  And the etching is thick.  This isn't the crappy stuff you find these days.  This is quality, and it shows me that spending some money up front, may make a life statement to those that love you down the line.  These were already put away, up high in the cabinet, but I took one down to show you!)


 These may just be "things" and you may think it odd to be this cheerful over them.  I don't feel the same, because I've not got the chance to spend as much time as I would have liked with my Nana.  That coupled with not having a large extended family, I'm probably grasping for straws, but at least it's a start.  Because I know these pieces have a history from her, they're even more special.  I look forward to the weekends that I now get to spend with her and my mom doing things 3 generations of girls would love to do: tea, shopping, talking, etc. 

Love you Nana!


Weekend Recap: Thanksgiving

Now that the weekend is officially over (*tear*), I felt energized, and excited to start the new week, all because of the great progress from the weekend.  Plus, it's now OFFICIALLY Christmas Season, didn't you hear the gunshot when you put your last turkey-stuffed fork down?!

For my own record keeping, here's the list of events from the last 4 days:

Thursday, THANKSGIVING
  1. Wake up at 7:30, get ready to go, stop at store to buy drinks and flowers
  2. Breakfast at Mom's house- eggs benedict, and hanging with the family (my side)
  3. Back to the store to buy more flowers, gather the dogs up, head out again
  4. Real Thanksgiving Dinner around 2:30, home around 5
  5. Off to Michael's for some doorbuster shopping with an extra 25% off coupon from 5p-9p
  6. Awake, organizing, and starting to put out Christmas decor till 12...
Friday, Black Friday
  1. Sleep in, while Z gets up at 4 to try to get a new laptop at Bestbuy (fail, btw)
  2. Head out around 11- try to get to Joanne's & Michael's by 12 to use the coupons.  (fail, btw)
  3. End up at Dollar Store, Starbucks, and thrifting
  4. 1:00 pedicure appointment with the little sister, then home to craft our faux boxwood star pendents (project to be shown soon).
  5. Sushi for dinner with Z, because what else says "Christmas" than sushi?
  6. Awake, organizing, and starting to put out Christmas decor till 12...
Saturday, Regular Weekend Days
  1. Sleep in, till about 9:00 (thank you Lexi for not whining/crying!)
  2. TV for a bit, cereal for breakfast. 
  3. Out the door by 11.  Off to Staples (office 2007), Ace (more plastic for the popcorn removal), Office Depot (fail, btw) and Best Buy (fail, btw)
  4. Home and prepping dining room and hallway for popcorn removal.  Prepped by 3:45, and removal commenced.  Daylight runs out, some light left, and Z comes to help!
  5. Pull all plastic down, vaccuum, shower in the hall bath for the first time ever in our new house (it's been a year and a half...)
  6. Dinner of Champions, with dessert
  7. Blog, hang out, look at my marvelous smooth (albeit messy, wet appearing, and dank smelling) ceiling
  8. Sleep by 12
Sunday, Time to relax?
  1. Sleep in again, till around 9 (sweet!) cereal for breakfast, prep room for Christmas Tree
  2. Borrow family's SUV, stop at one Tree lot (Find tree) head home!
  3. Tree up, lighted, decorated by 3:00 (yes, I work fast, because I love it!)
  4. Decorate the rest of the house, including my silver fireplace mantle (that I'll show later)
  5. Fat Dinner of Pizza & Wine with Z's family, home by 8
  6. More Christmas Decor, magazine reading, and blogging
  7. Bed by 9.  Magazines for a bit.  Sleep by 9:45.
Whew.  Just typing it all out makes me tired!  I think I run on some different sort of fuel on the weekends- when it's my time, and I have things to do!

Monday has become just as busy, and there are things to do-

I'll get back to posting some projects, features, and decor ideas soon.

Was your weekend as crazy as mine?  Crazier?  I actually think this weekend could have been a lot more insane!  Happy Holidays everyone, and an early Merry Christmas (the first of many wishes of this, I'm sure.)

Sunday, November 29, 2009

Downtime with the Times

Ok, not the traditional "Times" (the newspaper) but, these:


How on earth did I let this many of my favorite reads stack up?

What's here:
Pottery Barn Christmas
Anthropologie
Ballard Designs
Real Simple
Frontgate
Pottery Barn Kids
The Family Handyman (article on popcorn ceilings and painting kitchen cabinets over the weekend :) )
Restoration Hardware Gifts

AND... My Fav?

HOUSE BEAUTIFUL!

I may be, um, away for a while.  :)


Saturday, November 28, 2009

HTML Code Flashback

So did you notice it?  Yep.  I dabble in Website design.  *crickets*

Ok, just kidding.

Did you notice the change to the layout of my little world here at Design_Aholic?  Welp- I now have 3 columns, instead of just two!  Yay- more room for buttons, widgets, lists, and customization!

I had to search for "3 columns in blog" in google search, after the link that Cathe posted over at "Just Something I made" was unable to be found.

I used two tutorials over at "Three Column Blogger"

1.  First, how to actually make the third column for my minima template
2.  Second, setting margins between columns, and column widths

Both worked fabulously, and now I'm excited to get onto the customization.  Damn Blogger- I'm staying up 2+ hours past my normal bedtime now just to read and play around with postings.

Good luck if you need/want to do this to your blog too!

Friday, November 27, 2009

The FINALLY Wreath

Have you ever seen something in a store, that you think you just have to have, but it looks so simple to make?  I'm pretty crafty (duh) and felt I may have been the only one in the world without one of these yet:


After seeing a few posts in blogworld lately on how to construct one, I promptly knew what I would do with the stacks and stacks of red & silver ornaments I had been picking up while thrifting over the last month in anticipation for the season :)

First, I tried it the way I saw it over at Thrifty Decor Chick and at Chris's place, Just a girl.


(I have to say, this wreath may be in my future for Easter...  I don't even want to think THAT far ahead yet!)


But that was a big, fat FAIL for me.  Even Eddie Ross did it, but I couldn't?


Boo.  I felt the crafting spirit drain from my body.  THEN, I realized I had two 10" foam wreaths that I could use.  Done.  And the crafting spirit was back, baby!

Here's what YOU need to make this in my version, and how I did it:

(I made two wreaths, so I used twice this material)

Foam wreath, 10"
Red Spray Paint, Cardinal Red
~48 ball ornaments of various sizes (for each wreath)
Glue Gun
Ribbon (to hang)


I sprayed the foam wreaths with cardinal red spray paint, because when working with round objects, you'll never be able to cover the entire surface properly (learned this while making this project).  So, in order to blend in, I painted the wreath the color of the majority of the ornaments.

After taking Chris's advice, I glue the tops on all of my ornaments prior to beginning.  In reality for my version (glued to the foam wreath) I probably didn't need to, but when someone like Chris or Eddie tell you to do it, you do it.  :)

I just started gluing the largest ornaments on first, then started filling in with smaller ones, working in sections so that it looked full.  Its supposed to look random, yet still circular.


I added a small ribbon and hid it under the ornaments, so that later I could use it to hang with if need be.


That's it!  Super easy project, but a bit tedious to make the ornaments fit in the sections the right way- sort of like a puzzle.  Add a ribbon, hang, and again, admire your work!


And, here's the aftermath of the boxes, and boxes of ornaments I used to complete these two wreaths :)


 I added my wreaths to flank the sides of the front room windows.  With the tree tomorrow, they'll add a nice pop of color to the blue walls.

Cost:

2 Foam Wreaths, $2 ($1/ea at Dollar Store)
Ornaments, $16
Spray Paint, already had

$18 for two wreaths :) and a big smile on my face

Have you done this project???  Any suggestions to the readers for those that have yet to create it?

Tuesday, November 24, 2009

Modern Dog Silhouettes

If you don't know me well already, you're probably going to gather soon that I'm a pretty classic person when it comes to design.  Classic, with a modern/contemporary twist.  Plus, I love our dogs!  They're our fur-babies, as I've heard the term used.  :)

We've got two goof balls: Gunner, he's almost 3- he's a chocolate cocker spaniel.  And, the baby, Lexi, who's just over 8 months old, and is a Boxer Labrador mix.  Yep.  That's right, she's a Boxador.  :)

I love the clean lines I've seen in some great silhouette artwork floating around, and I really wanted my own!  I toyed with some different options tonight, but finally came up with this:


I have seen lots of great displays online and in blogland.  Here were some of my inspirations:

YoungHouseLove, Burger's Silhouette (their suave chihuahua)


LivingwithLindsay, children's Silhouette (both etched glass and traditional black and white!  Swoon!  Oh, and that book wreath will be mine this weekend too, just you wait.  I have all the supplies ready!)


Silhouette displays, via google


(How cool would these be?!  I may make some too, or you can, and share your creations with me!)

These were pretty easy to make, and again, I'm staring at them, just enjoying them!

Materials I used:

Printed profile shots (of my cutie doggies, as mentioned above...)
2, 11x17" picture frames with a double mat, and shadow box style
1 peice of scrapbook paper enough to cut two 5.5x7.5" rectangles for backing
thin foam sheet, in black
tacky glue, scissors, tape, pencil (and eraser potentially!), Windex


I first cut out the two head shot profiles of my dogs.  I had printed these on the black and white printer, on regular paper.  I didn't bother doing the whole "tracing with a backlight" issue, because, well, it's nighttime here, and again, I'm impatient and wanted to do this tonight.  (NOTE: another thing you'll learn about me- I'm impatient once I get an idea in my head.  I'm dealing with it.  You'll be fine.  :)  )  I made sure after I cut them out that they fit right on the yellow sheets I already cut to size.

I made sure to use some sharp scisors to really make sure the detail around the edge was sharp as these were going to become my patterns traced onto the black foam sheet.


Next, trace with a pencil.  If you're using black foam sheets, I'd suggest to use something you can really see on the sheet, like a white pencil.  My regular lead pencil was difficult to see the lines, and I had to hold it up at the right angle under the kitchen light to see my traced line.   I'll pretend now that this reason for using the foam was my reason originally: if I want to change the paper their silhouettes are mounted on I can easily, since the paper should peel right off!  (The real reason I used the foam?  I was out of construction paper (plus that discolors) and I didn't have anything else black.  The texture works though, so it's a win win... yay!)


Anyway.  I cut both shapes out, and had already taped the scrapbook paper I cut into 5.5x7.5" rectangles to the back of the picture frame's mat.  Then, I used tacky glue and glued down all the edges, and center, since this is in a shadow box type frame.  I didn't want any lifting!  I get enough greif from the dogs themselves, I didn't need it from my artwork too.  :)


(doesn't that texture of the foam look so great?!  I love that I thought of that!  Sense the sarcasm.  I'll just warn you once!)


I cleaned the glass really well the first time after I tried to mat it for the first time and found a whole bunch of glitter, and other particles attached to my white mat.  Save yourself the headache and just clean thoroughly the first time. 

Hang, and pat yourself on the back!


(did you notice my tinsel trees?  :) see this post for how I did those)


Total cost, uh, hard to say.  I had all the material already.  I think the frames were $6 each on clearance at BedBath&Beyond, and they've been tucked away safely with the rest of my boxes of frames in the garage for a few months years.  I always like to buy things on clearance, if they're a classic peice I know I'll be able to use somehwere.  Don't judge. 

What are your favorite photo displays?  Do you like to update classic peices in a modern way?  Do share!

Sunday, November 22, 2009

Tinsel Garland Trees

It's Thanksgiving in T-minus 4 days, but as like most of us, the Christmas bug has hit!  It's my favorite time of the year.  I wish it felt more like Christmas here in CA, but it's been rather warm, and no rain.  Boo.  So it's a bit harder to realize it's the season!

Anyway, I digress.  I found a few Christmas Tree cone projects out there in blogland, and really liked the idea!  I purchased two larger white cones, perfect to make trees... but it took a while to decide what I wanted to do!  I gathered pine cones, while in Tahoe last weekend, and had thought to make a pine cone tree, but decided against that for now.  While thrifting last week however, I found two gloriously sparkling tinsel garlands for $.99 each (one was 21' long, the other 15' long.  I used all but 1 ft of the 21' garland, and half of the 15' garland).  I woke up this morning realizing I FINALLY knew what I wanted to do!  Tinsel trees and glimmering bows on top!


Here's how I made them...

I purchased 2 cones at Michael's, 1 was nearly 24", and the other 17" tall.  I used a 40% off coupon on the larger one, so the two of them together were $16.  I also had purchased a roll of silver dotted, wire edged ribbon last week for 50% off, so it was $3 for the spool for 10 yards.  I gathered up my hot glue gun, and extra sticks.


I had to repair a crack in the larger cone, after already taking the first one I purchased back.  I just used some hot glue in the crack, and really smushed it together.  :)


Then, I started at the top of the cone, and wrapped my way down!  I glued about every 2nd wrapping to secure the rings.


After both were wrapped, I tied bows out of the silver ribbon, and glued the heck out of them to the top.  I may pin them later to make sure they stay.  :)


Fluff the tinsel garland, and display!  These quickly became one of my favorite projects... I was just staring, and staring, and...


Awww, this really helped get me in the spirit...  Now where's the Peppermint Hot Chocolate?!
Related Posts with Thumbnails