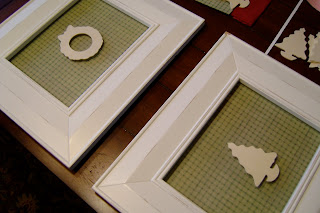
Very Country Living, no? With a touch of bling?
First, I stumbled upon these great white Pottery Barn picture frames at the thrift store one day. How awesome- I'd always wanted some of these! They're 8x10 sized, distressed, with chunky white frames. BUT, the best part? They're the kind that you can simply slip a photo into from the slot- no taking the back off, no unscrewing, etc. (I first came upon these in my babysitting years, when my favorite family had them in their twin girls rooms. Such a great idea to slip in those art projects they're always making. Classes them up and makes them feel so special!)
Anywho, they were $3.99 each. SCORE!
Then, a few weeks back, I came across 3 packs of these Christmas shape chipboard cutouts. Each pack was $0.39. I thought of five or six different projects I could do with them. Wrap them in yarn? Make a garland? Use them together to make a wreath? I finally settled on framing them!
So, I found green scrapbook paper I liked, and cut two of them to size. I played around with the shapes until I found the position and pattern that would suit me. I decided on one shape in each frame. Very silhouette-esque (like these modern dog silhouette frames I made) and very clean.
Then came the glitter. I kept it monochrome. Green with a touch of silver glitter. Use a thin (but with enough that a nice layer of glitter stuck!) layer of tacky glue, and a paint brush to make sure each edge is covered. Then glitter. Yes, it got everywhere, and yes, the dogs seem to have ground it into the rug.
I cut a 5x7 piece of watercolor (thick white paper would work) paper and mounted the shape with tacky glue onto it. Then, mounted the 5x7 sheet onto the scrapbook paper.
WAIT FOR THE GLUE TO DRY!
(I may or may not have the first one I made... I may or may not only have 4 of the tree shapes left, because I may or may not have ruined one by not waiting...)
Then, slip into frame!
I sure am going to miss the holidays. These will probably stay up for a while after Christmas is over.
Oh, and those rocking horses pictured above? THOSE are going to be used in a child's room decor, or something similar.
Don't you love the bling of the holidays?!


