Pages

WELCOME!

Happy 2012!

Welcome, won't you stay a while? There's so much to do, and we hope to share it all with you this year. Design, crafts, frugal living... You'll find this and more at Design-Aholic!

Sunday, February 28, 2010

Why I need an SUV

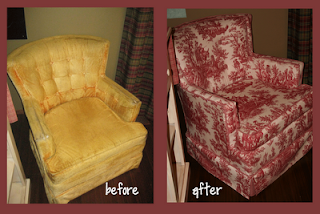
Shopping early yesterday morning, fruited me the following chair- times two.  They were $5 each. 


I started to get the creative juices flowing- would I refinish the wood?  Paint it?  What type of fabric?!  I was excited at first...

But, not even one would fit in my car.  I moved the seats, tried the back seat, trunk, and even the front passenger seat.

Nada.  Nope.  Zilch.  Chairs would.not.fit.  We had plans in the early afternoon, and dinner plans in the evening.  Even if they couldn't go in the house right away, I could re-upolster and sell them later. 

Denied.  ugh! 

PLUS, remember that buffet I told you about during my shopping trip post the other day?  It was still there yesterday, dropped in price $200, and on the 50% day would have been only $100!  (I still was holding out.  I'd certainly pay $50 for it though!)  But, I still wouldn't have been able to get it home!


Sad face.  Again.

Good thing we're already looking into getting an SUV.  Anyone have any of the following options that they'd be willing to share about?  Right now, I have a 325i (love it!) and haven't even owned an SUV or truck (even though I learned to drive in a suburban and an expedition).

I love all of these options, but of course the price ranges.  I'll post them from lowest to highest.  And yes, they're all white on purpose.  I'm pretty sure I want a white one!  :)

Honda CR-V


Toyota Rav 4

Ford Edge


BMW X3


Volvo XC90


So, perhaps when we have an SUV, I'll have a more lucrative furniture business.  Lets be honest.  It doesn't exist now.  BUT, I love working with my hands, and it would be so fun!  :)
Do you hate these options?  Do you love one, or more of them?  Have you driven them, or been a passenger?  Do tell!

Friday, February 26, 2010

Easy Friday Night Dinner and Cookies

I was scouring the fridge tonight for something- leftovers, the standard tortellini, or something I could make.  I came up with this quick soup- made from things we had in the fridge, and a can of chicken broth:


Ingredients:
1 can chicken broth
1/2 cup shredded chicken
1/2 cup rice
fresh spinach
cut carrots, about 1/4 cup
small pinch of ground pepper

Simmer on the stove, and enjoy when hot!


Oh, and for dessert tonight?  I made a package of those betty crocker sugar cookies.  I've had better, but they're alright.  I just sprinkled some white sugar on them before baking.  Yum yum!


Send me your address, and I'll send you a cookie- I've got plenty left- for now :)

Happy Friday!  Stay warm, and dry, out there.

Thursday, February 25, 2010

VOTW #9 & The recaps 6, 7, & 8

Here we go with the 9th edition of VOTW: Victory of the Week!

We do this every week here at Design-Aholic, and the goal is always the same: These links allow us to remember the small (or large!) Victories that we all have each week.  It's good for morale, stress, and our attitude to remember that sometimes, it's the small things in life that matter.  So, whether you're proud of a recipe, a project, your kids, or whatever, link up and let the world (well, at least the blog world!) know.

:)

So, my victory this week?  As I mentioned in my posts this week, I've been tired beyond belief.  I'm just excited to recap the last 3 weeks of VOTW.  Here we go!

Week 6, there were 9 Links:

Missy @ The Little Green Bean made an awesome Memory Necklace:


Carolyn @ My Backyard Eden had a grand old time with her power tools after trimming out her new bathroom!


Rocio @ Casa Haus made a real life topiary, growing and all!


Week 7 brought 23 links- 23!!
 
Leanne @ Organize & Decorate Everything showed us how to spell it out in frames:


Golf Gal @ Tales of a Golf Gal shows us how to Make (yes Make!) baby crib bedding.  Um, bookmark?  Yes!


Bird @ Bird Crafts showed us how she transformed those thrift store finds into amazing pieces:


Chelsea @ This Fresh Fossil repainted her WHOLE living room!


Erin posted about taming her long necklaces on this great project:


Week 8 also brought 23 link-ups!

Over @ A Crafty Amateur, we learn how to really replace a seat in a chair.  I could have used this about 5 months ago!


By far, my favorite was over at Simply Stafford, where we were shown how to SPRAY PAINT (yes, SPRAY PAINT!) our kitchen cabinets.  Check, and check.  :) Can you believe that spray paint was used here?!  I can't, but I'm elated!


This yummy oreo ice cream delight was shared from over @ Kuzak's Closet from her birthday!  (Yay Feb birthdays!)


Karli @ The World Spins Madly On did this fabulous full on chair re-vamp:


And I have to show this one by Stephanie @ My Frugal Lifestyle where she uses cereal boxes as magazine holders, because I'm seriously dealing with the magazine explosion in my place right now.  Come on Z, eat up that Life Cereal quicker!


So, now, come on, with all that inspiration YOU were bound to have something you're proud of.  It doesn't have to be just from last week, so as I stated earlier what this party's goal is, link up folks!


(oh, and grab a button if you don't have one already- code is on the right side at the top of the page!)


Have a great weekend all :)

Wednesday, February 24, 2010

More on the living room...

Continuing with the living room re-decorate, I pulled out the trusty sewing machine, and sewed me up some pillows!

No tutorial here, because as I was making them, I didn't have a clue what I was doing, so I didn't take photos.

Remember this post where I showed you my inspiration and the fabrics I purchased to get the room going?  Well, here are photos of the 16" pillow cases I made:

 
Front

Back, with an envelope closure


BUT, let me just tell you... it's all straight seams, so who needs a tutorial?  I used the old pillow covers as a size guide, and just cut my fabric about 1 1/2" bigger.  I made an envelope closure, which while inside out to sew it did stump me for a min.  I just suggest to pin it all up and basically turn it right side out to make sure it's what you want, then turn it inside out again, and sew!

So the room is coming together.  Here's the inspiration again along with the fabrics I chose:


Plus, on my shopping trip post, I learned I wasn't crazy to create a zebra ottoman.  Hey, if Target has my idea, then it's gotta be a good one, right?!  :)  You should check that post out...


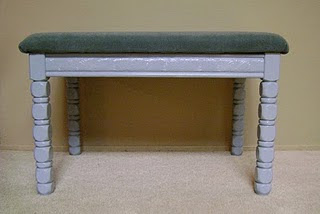
What do you think about these?  The color "goes" with the curtains I also made, but is still far enough from them that it's not too much orange.  The rest of the pillows will be different colors!  And, I'm going to paint my small bench black, and that blue top will really pop!


I'm tired again tonight.  I know this is a phase, but I'm missing checking up on everyone's good work.  I hope you all have a great Thursday!

Tuesday, February 23, 2010

Mass-o-Glass

Sorry for no post yesterday!  *sad face*  I've been beat.  As in super duper tired.  Like, I went to bed at (or before!) 8:15 the last 7 days.

In fact, I haven't read a blog post in 3 days, which is like sacralidge.  :)  Ok, not that bad, but you get the idea!

Onto the good stuff...

As spring was approaching, and all those great vase fillers start to come out, I wanted to show you some easy and cheap-o glass displays you could MAKE.  I know, it seems contrary, but I like the FILLERS so much, that I needed more containers for all the good stuff!

I made the following items:
  • an apothecary jar
  • 2 glass hurricanes
  • 1 cake stand
  • 1 footed bowl

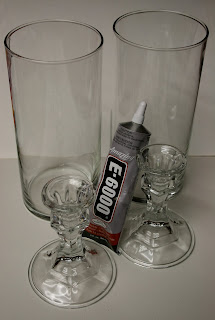
The ingredients are simple: some glass dishes, some glass candlesticks, and some E-6000 glue.  Oh, and an open window.  :)

First, you might have seen the glass hurricanes back around Christmas time.  These were as easy as the rest of them.  I found what were two tall perfectly cylindrical glasses at the dollar store, in the dish area.  Perfect for hurricanes, which of course I've seen others do before.  I then also picked up 2 glass candlesticks.  $4 for these.


All I did was add a ring of that stinky, smell glue to the rim of the candlestick, then carefully pushed the glass onto it.  The benefit of working with glass is that when you attach them together, you can see through and make sure that things are perfectly lined up!


Then, leave somewhere to dry for a few hours (I think you're supposed to leave it for 24 hours?  I did for some, but not all)

For the cake stand and the footed bowl, I simply picked up a glass bowl and a decorative glass plate, also at the dollar store, and followed the same process from above.  The bowl was great at Christmastime, because I displayed the christmas crayons I made for the kids in them!  And now, I have a cute little nest with blue egg soaps for spring!


(If you're interested in that key artwork I made, you can go HERE for the project link!)


Regarding the apothecary jar, I found the base jar at a thrift store for $1.99.  I just added a glass candlestick to the underside, and voila! $2.99 apothecary jar!


Now, how ironic is it that most of the jars are empty?!  That's because I'll show you later how I filled them all.  Oh, and where I put them all.  :)


I miss you all, and will hope to be back full force again in a few days!
Hope you're all doing well-
Related Posts with Thumbnails