*Today, 1/20/10 is the last day to comment and be entered for the Valentine's Banner Giveaway. Be sure to check out the post here for your chance to W-I-N*
Ok, onto the real project... (did you realize this was another from my teaser the other day?) This has to be one of the most inexpensive, yet classy projects I've done yet. :) Total for the project: $1.70, and everything was brand new. How you say?
Well, I purchased this roughly 30" solid wood plaque at HomeGoods this weekend deeply discounted on clearance for $0.70. Yes, 70 cents. It was still wrapped in plastic, and had corner cardboard, so it was well protected. Just, the pattern didn't suit my decor.
I really love inspirational signs, so I figured I could use this plaque to make one. Since I don't have my own vinyl cutter like I've seen people using, I resorted to modifying a dollar store vinyl phrase that I purchased. (I also purchased 2 others, but I haven't figured out just where to use them yet.)
So, here are the simple steps to this project... pretty self explanatory!
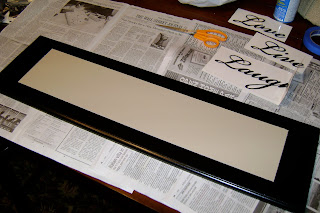
First, I spray paint the plaque. I started with just doing the edges brown, and then changed direction mid project, and used a semi gloss black over the whole thing. Since my vinyl lettering was black, I needed a band of contrast to really allow the lettering to pop. I taped off a rectangle that the three words I was using would fit in, and coated it in tan acrylic paint. I did about 3-4 coats to cover without brush strokes. Had it not been raining, I would have just spray painted this. Would have been much easier!
Anyway, after my exercise in patience, since I'm so good at that, and the paint dried, I added a strip of blue painters tape that would be my straight line marker for where the lettering should go.
The vinyl then just needs to be rubbed on, so I placed it and then used my World Market card to smooth it down. :) No significance in the facet that it was the World Market card, just thought I'd share that I like to shop there on occasion.
Repeat 2 more times, until all words are done, then proudly show your fiance your project. He'll even smile and say "awww, I like it!" I promise. :)
What do you think? I could see adding some hooks to the bottom of this one, but I'm not sure just yet the final embellishments. Any ideas? It's a pretty sturdy sign!
Thanks for reading my ramblings, and hope you liked this simple project again.
Today, 1/20/10 is the last day to comment and enter the giveaway! Go here to enter to win this banner:


