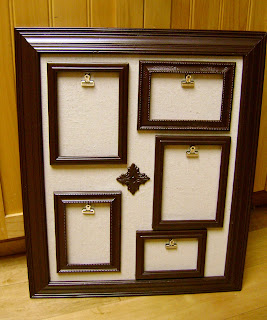
Here's what I made:
I was ELATED to have finished these! One was supposed to be a gift for a friend that bought a new house a month back. Well, I guess it's better late than never!
I got this fabulous idea from the girls over at Shanty 2 Chic- if you haven't checked their site out you should- inspiration galore!
While these may look pretty now, they started life on a whole other planet. Somewhere far, far from what I'm going for in my house. But, that's what the beauty of paint will do for you. :)
The white one started out as this great duck print:
While the brown one housed a *gasp* jungle cat! Oh my:
I picked both the large frames up at a 50% day at the thrift store. They came to $7.50 total. They were the perfect size, and had good bones. check!
The other materials I needed were:
- 1 yard of burlap, duck clock, or other fabric. My option was $2.99/yd
- dollar store frames (or other frames you'd like to use. Surprisingly, the dollar store has a wide selection of frames that look great when painted. Just sayin'...
- medallion of choice
- BULLDOG CLIPS! (or other clip you'd like to use. I liked their simplicity, which caused me to look everywhere for the exact ones I wanted...)
- Spray paint in color of choice, hot glue gun
I started out by doing the white one first. Big mistake. Or, if you want to think of it another way, it was a learning experience. While the wood frame primed and painted nice, I found out that the plastic frames I snagged at the dollar store didn't like spray paint. They were red, oh red! The spray paint only masked it, and they turned pink! Even with spray paint meant for plastic! (*So, note: if you're using plastic frames, spray them a color DARKER than they originate... sigh)
Anyway, I also painted the print with the primer (since the awesome pattern of the ducks/jaguar showed through the fabric I purchased).
I then got to use spray adhesive for the first time on a project! I sprayed, and applied the fabric, smoothing out wrinkles and bumps here and there. I wrapped around the back side, and secured with hot glue at the edges.
I purchased two wooden medalions from Joann's and Michael's, that I painted with the frames. I think they were around $2 each.
Next, I tried to reposition the frame set a few times, since I wasn't sure how many I could really get in the center. Turns out 5 look better than 4, but when you make this project, you'll do the right thing. :)
(see! Those are PINK frames!)
Then, I replaced the fabric covered board into the frame, and used hot glue to secure the frames (once I settled on placement!) to the board.
I also centered, and hot glued my little 1" bulldog clips to the board.
ahhh... victory!
(I love how this frame bubbled a little. Added that real crackle look, without even trying!)
Don't you love these? I can't wait to give one as a gift... If it doesn't jump onto my wall first. :)
Total cost for Two frame sets:
$7.50 (two main frames), $2.99 (fabric), $4 frames (for white set), $4 frames (for brown set, yes, 2 of the frames were a 2-pk for $1), $4.50 for medallions, $2.60 for the bulldogs clips (when you calculate that I paid $10.50 for 36)=
$25 for TWO, or $12.50/ea.
(what I didn't add in to the cost was the spray adhesive, the EXTRA bulldog clips, the spray paint for plastic, or the EXTRA dollar store frames I now have laying around for other projects. That would have added another $20 to the total.)
Anyway, this project was definitely trying, to say the least. I'm glad they're done, and thankful, yes thankful, for the project know-how I learned whilst making them. :)
What do you think?! I think mine will go in the new office. When we get there.

